
Configuring SNMP (Simple Network Management Protocol) on Windows 7.
Step I - Step I - Go to control panel.


Step I - Step I - Go to control panel.

Fig - 1
Step II - In control panel click on Programs.

Fig - 2
Step III - Now Click on Programs & Features

Fig - 3
Step IV - Click Turn Windows Features on or off.

Fig -4
Step V - On pop up menu scroll down and click on Simple Network Management Protocol and WMI SNMP Provider then click OK.

Fig - 5
Step VI - Now Feature of SNMP will install.

Fig - 6
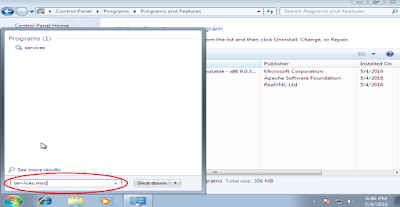
Step VII - Once the feature install go to services by following below figure.

Fig - 7
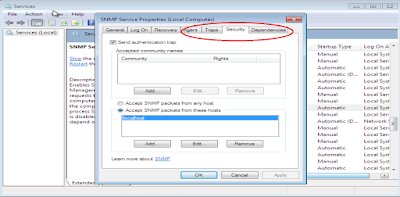
Step VIII - On pop up menu scroll down to SNMP service Right Click on it then Properties and click on Security tab.

Fig - 8
Step IX - In security Tab click on Add and right public in Community Name then click on Add.

Fig - 9
Step X - After adding Community Name click on 'Accept SNMP Packets from any host' radio button then click ok apply.

Fig - 10
Step XI - Close all the open windows/tab
Now SNMP in Windows 7 will start working.
Note:- All the above steps to be done by Administrative privilege.
Thanks......
No comments:
Post a Comment