
Q.how to make Windows 7 bootable USB with power iso?
Ans. To create a bootable USB from Power iso you need to follow following steps:-
Prerequisites:- You should have Power iso software installed in your system, genuine Windows 7 iso Image soft copy and should have at least 1 min 4GB USB drive.
Step I - Firstly you need to download the latest version of Power ISO software if not available with you download link is available below. and install it in your system.
Link for power iso Link
Download the link as per your hardware architecture 32 bit or 64 bit.

Step II - Connect USB drive to the system then run Power Iso as Administrator.

Click yes on User Account Control Pop up.

Step III - When software opens click on file then open and give the path of windows 7 Iso image and open it.


Step IV - Click on Tools then Create USB bootable USB drive...

Step V - Pop up menu appears on pop up menu you need to select the destination USB Drive then click on start to start the process.

Step VI - Now process will ask you to overwrite the usb drive on that you just need to click ok.

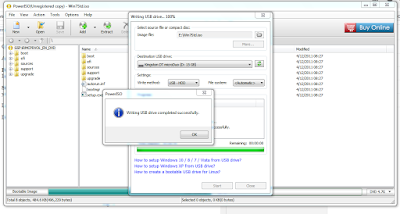
Step VII - Now process will start and show you the estimate time to complete the process.

Step VIII - Click OK now your pen drive is ready to install Windows 7.
Thanks...
Ans. To create a bootable USB from Power iso you need to follow following steps:-
Prerequisites:- You should have Power iso software installed in your system, genuine Windows 7 iso Image soft copy and should have at least 1 min 4GB USB drive.
Step I - Firstly you need to download the latest version of Power ISO software if not available with you download link is available below. and install it in your system.
Link for power iso Link
Download the link as per your hardware architecture 32 bit or 64 bit.

Fig -1
Step II - Connect USB drive to the system then run Power Iso as Administrator.

Fig - 2
Click yes on User Account Control Pop up.

Fig - 3
Step III - When software opens click on file then open and give the path of windows 7 Iso image and open it.

Fig - 4

Fig - 5
Step IV - Click on Tools then Create USB bootable USB drive...

Fig - 6
Step V - Pop up menu appears on pop up menu you need to select the destination USB Drive then click on start to start the process.

Fig - 7
Step VI - Now process will ask you to overwrite the usb drive on that you just need to click ok.

Fig - 8
Step VII - Now process will start and show you the estimate time to complete the process.

Fig - 9
Step VIII - Click OK now your pen drive is ready to install Windows 7.

Fig - 10
Thanks...


